Thursday, June 30, 2011

Was ist eine Flügeltreppe ?

       Was ist eine Flügeltreppe ? Answer there is no such thing ! Or is there ? As the bed is 43" high I needed a ladder to get in and out of the bed, but that idea was total crap. I felt like I would break my neck on that ladder getting in and out of the 43" high bed. So I decided to invent stairs with wings... ie. Flügeltreppe !! All inventions have to have German names as they easily describe the concept in one word. This stupid little idea took some time to build and putz around with, but in the end I am very happy with the way it works. It is now very easy to get in and out of the bed, looks nice and cost about $40 to build out of oak wood with the finish. I think it would support about 400+ lbs- more then a regular ladder. It is also easy to remove and allow access to the cabinets under the bed.


Flügeltreppe - stairs with wings, makes it easy to get in and out of 43" high bed.


Below is the finished floor, nice contrast with the cabinets.

The Porta Potty

      Wow, when I checked the stats today I noticed I had a bunch of views from  Mikenchell.com/forms , I had just joined that form a few days ago and was thinking when I find the time, I will also post some of my stuff there, those tear drop builders really know their stuff, I wish I had found them 6 months ago. Feel free to leave your comments on this blog. I still have lots of questions about stuff that is yet to be installed.


       Here is the view of the Porta Potty as you enter the trailer. When its all done it will look like a place to sit and relax. I had some left over flooring so I will use that for the front section. After much research and experimentation I decided on the "build my own porta potty method" because as I was looking around I noticed places, more and more wanted to charge $10 - $20 to dump your waste. As I mostly wanted to do boondocking or coyote camping, with a little cargo trailer I could go broke on dump fees. The loveable Loo gave me some great ideas. so I want to give you a link to their  web site below in red. 


http://humanurehandbook.com/store/LOVEABLE-LOO-Eco-Toilet.html


       Rather then have a bucket of sawdust , peat moss or something sitting next to the potty as they do, I decided to build a box inside a box, after all if you slam on the trailer breaks you don't want that stuff flying around the trailer - what a mess that would be. I also made the box approx. 20" high that was a perfect height for me, as you get older,  it gets harder and harder to get up from the pot. So I built the first handicapped porta potty. Generally at home those raised toilets are approx. 17" high. The whole box is approx. 27" wide  x 20" high  x 27" deep. I will install - bolt a bucket onto the floor & the potty bucket will actually sit secure inside that bucket. Then around the outside of the first bucket and inside that box will be the peat moss. I have personally tried this method in my bedroom "as I was a total non believer" about the smell and it does work. Just as an extra safety back up, because this is over the top cargo trailer, I will also install a 12 volt fan. Pictures of the whole set up will come latter. This method would also be a great emergency backup for your house if an earthquake or something happens. This is my only low tech - green solution, as I did not want to go broke on dump fees. If one wanted a regular toilet and flush tank could be installed there, but water weighs a lot, keep that in mind.


Chick here & go to the future with fan installed.

Interior design


Here is the new carpet on the rear door,
it replaced the first design.


Below is the first design 


Slowly I'm getting around to the interior design, I just had a little idea for the rear door design - does it look a little like texas. Now I just need a little Arizona design, then I will blend in all over the place. I was trying to decide if I should use stained wood or a white color ? Well maybe both ? Time will tell.


Friday, June 24, 2011

Wood flooring has arrived and is being installed

        The flooring was picked up last night, 5 minutes prior to store closing, in the middle of rush hour. Its about 1/2 installed, the tricky parts of the installation are yet to come. 45 sq. ft might not sound like a lot, but there are some tricky cuts and it is not easy to install the last row under the cabinet. The flooring is not packed very well and the end joints were mostly damaged and do not fit together very well, at least not to my satisfaction. 


Flooring has nice contrast with cabinets.


Flooring partial completion.


A little dental molding trim for the cabinets.


The housing for the fan under the location where the a/c sits.


The fan box has extra holes for additional air flow.


There is a middle metal damper plate to help seal off the compartment.


And a little door to close off the whole compartment, 
keeps things nice and tight.

Monday, June 20, 2011

Insulation is working as well as expected

        With the new roof having 3 layers of white paint I was pleasantly surprised at the interior trailer temperature today. As you can see the proof is in the pudding, the interior temp was the same as the exterior. I was expecting to get an additional 5-6 degrees more inside, so I was very happy with the result. By the way I left the roof vent open 1-2". I have also put the thermostat on the ceiling, where it will get the hottest, down on the floor it is normally about 5-6 deg lower, I am always looking for worst case. Tomorrow I will try and do the final hookup for the a/c unit maybe, so I can do some more testing to see what I can get with the 7,000 Btu from LG. It would be nice to get 100 outside and to be able to measure how much power and how low the temperature would go. That way I could figure out how much solar power I would need worst case.


The bottom row has the min & max temp.


I'm more a 50 to 75 deg kinda guy.

Friday, June 17, 2011

Wood flooring has been ordered, est. delivery 1 week

      I was planing to buy the flooring at Southern Lumber, but they gave me so much JAZZ with a $100 sample deposit ( which I had for 60 minutes ) on which they also wanted $9 sales tax, who ever heard of something so ridiculous ? $9 Sales tax on a deposit ? When I wanted to place the order, they also wanted another $65 in Freight charges to their store. They told me their profit on a $8 sq. ft. flooring was so thin, they could not possible sell it cheaper. STUPID people, if I have to pay freight charges, then it has to go to my home not their business. So they lost my business on this order.

      After a few calls around to some other companies, I found Gail Irwin from Conklin Bros on Almaden Exp. in San Jose. WOW she was so friendly, called me right back with a great price that I could live with and had me in and out of the store in 10 - 15 minutes. Once I sat down at her desk I never had to get out of the chair, not even to pay. She had keep all my info from when I called to write the order ticket.  She has about 10+ Salesman of the month awards on the front of her desk. I can see why, even with a small $460 order like mine, she treated me just like a real customer who was shopping for a 2,000 sq. ft. house. These days its really a rare treat that you still meet a professional with great pride & enjoyment in their work. Gail - Thanks for your Help !!

Thursday, June 16, 2011

Plastic 35 gallon water tank & 3TB hard drive

       Received the special order 35 gallon water tank today, with shipping and tax the whole unit was $280. NOT very happy with the quality of the tank, there is a 2" patch in the middle of the large side, that is only 1/4 as thick as the tank. All 4 of the larger sides are smashed in from 1/2 to 1" almost, don't see how the tank would hold 35 gallons with those dimensions....  I will have to talk to company rep to ship this tank back.... very, unhappy customer at this point. Follow up..( the tank holds about 32 gallons ) The company did ship me the clear inspection cover June 22nd. They promised up and down the tank will not leak, the bulges will come out when the tank is filled. Who knows ?  To move the project forward I ordered a 2nd tank from them that will hold 36 gallons and go in the front of the trailer, that would give me a total of approx. 71 gallons. They happen to have the exact dimensions that I need for this project........so there we go. If I add some 5 gallon paint buckets in the truck bed, maybe I can get 100 gallons for extended camping. 3 gal per day - maybe 30 days ?


Fits ok , except for the sides being smashed in 3/4"


Than tank cover was supposed to be clear - not white.


large - thin 2" patch to the side ??


New 3 TB hard drive to hold movies etc....

Possible wood floor selection

       Well what do you think, is this in keeping with the WOW factor for our over the top trailer ? Also here is picture of grouted counter top - edge trim still to be selected..


Woodland collection - Fine Line dark flooring.


Grouted glass counter top.

Tuesday, June 14, 2011

The glass tile counter tops

       I made a little progress on the glass top counter tops, same design as the kitchen / shower area. I will put some edge trim around all the counter tops latter. The small section of the counter top is removable, so that one can access the batteries inside the cabinet. Here is a picture of the DCS grill again , hope this one looks better ? I also can't say enough about the white roof, today is was 88 outside and temp inside the trailer at 4 pm was lower then outside.


The 2nd counter top is removable & has a hole in the back for 
the battery wires to go into a cabinet or something


I hope this is a better view of the DCS grill,
its the first thing you see when you come in the door.

Monday, June 13, 2011

More glitz for the DCS grill

      I installed some diamond plate around the grill, metal work is just not my greatest skill. The picture did not come out really great, it really looks great close up and in real life, maybe I will try another picture latter. I also decided to get a mickey mouse inverter, the cheaper modified sine wave, it was only $85 so I can play around and see how my stuff works before I spend my life savings on a $1,000+ pure sine model if needed. I also decided to get a separate & smaller battery charges, then a unit included with the Inverter. Normally a 60 amp charger is recommended for a quick recharge, but they also cost more and weigh a lot. The Xantrex was only $244 after some testing I will report back how well it works and if a larger unit is needed.


Before


After - picture is not good


Very basic Modified Sine Inverter- This Inverter after some testing is basically
Garbage !!! The a/c unit which is rated at 820 watts would not run with the inverter,
it tried to once, but the RED overload light was going like crazy !! 
Its says it will start up 2500 watts max 
The fan is also VERY LOUD !! - it would require the unit to be installed
inside a cabinet to keep the noise down. It takes 2-3 try's to start the TV
My guess is this thing will max out at 600 - 700 watts.
Glad I only spent $85 on sale


Basic Xantra 20 amp charger


Extras also available for the charger.

Tuesday, June 7, 2011

Lots of rain, rain, rain and finally a little progress

        That was how the week went, rain, rain, rain and more rain, something that just does not happen in June. You just can't do the cabinets in the rain. Today finally I removed the bed & cabinets and installed all the cabinets into their final place. Even the DSC 17,000 burner got a little test run. Its works great .. YAHOO !! I also ran a 3/4  PEX water line from the place where the rear 35 gallon water tank will go through the cabinets to the front shower & possible second 35 gallon water tank. Oh no ...,  I forgot to take some pictures of the 400 amp hour batteries hidden inside the 24" cabinet, I even drilled 6 air holes in the floor to allow the batteries to suck in fresh air and will make an air tight interior - exterior vented box latter. Don't want you guys to worry I will blow myself up while charging the batteries.


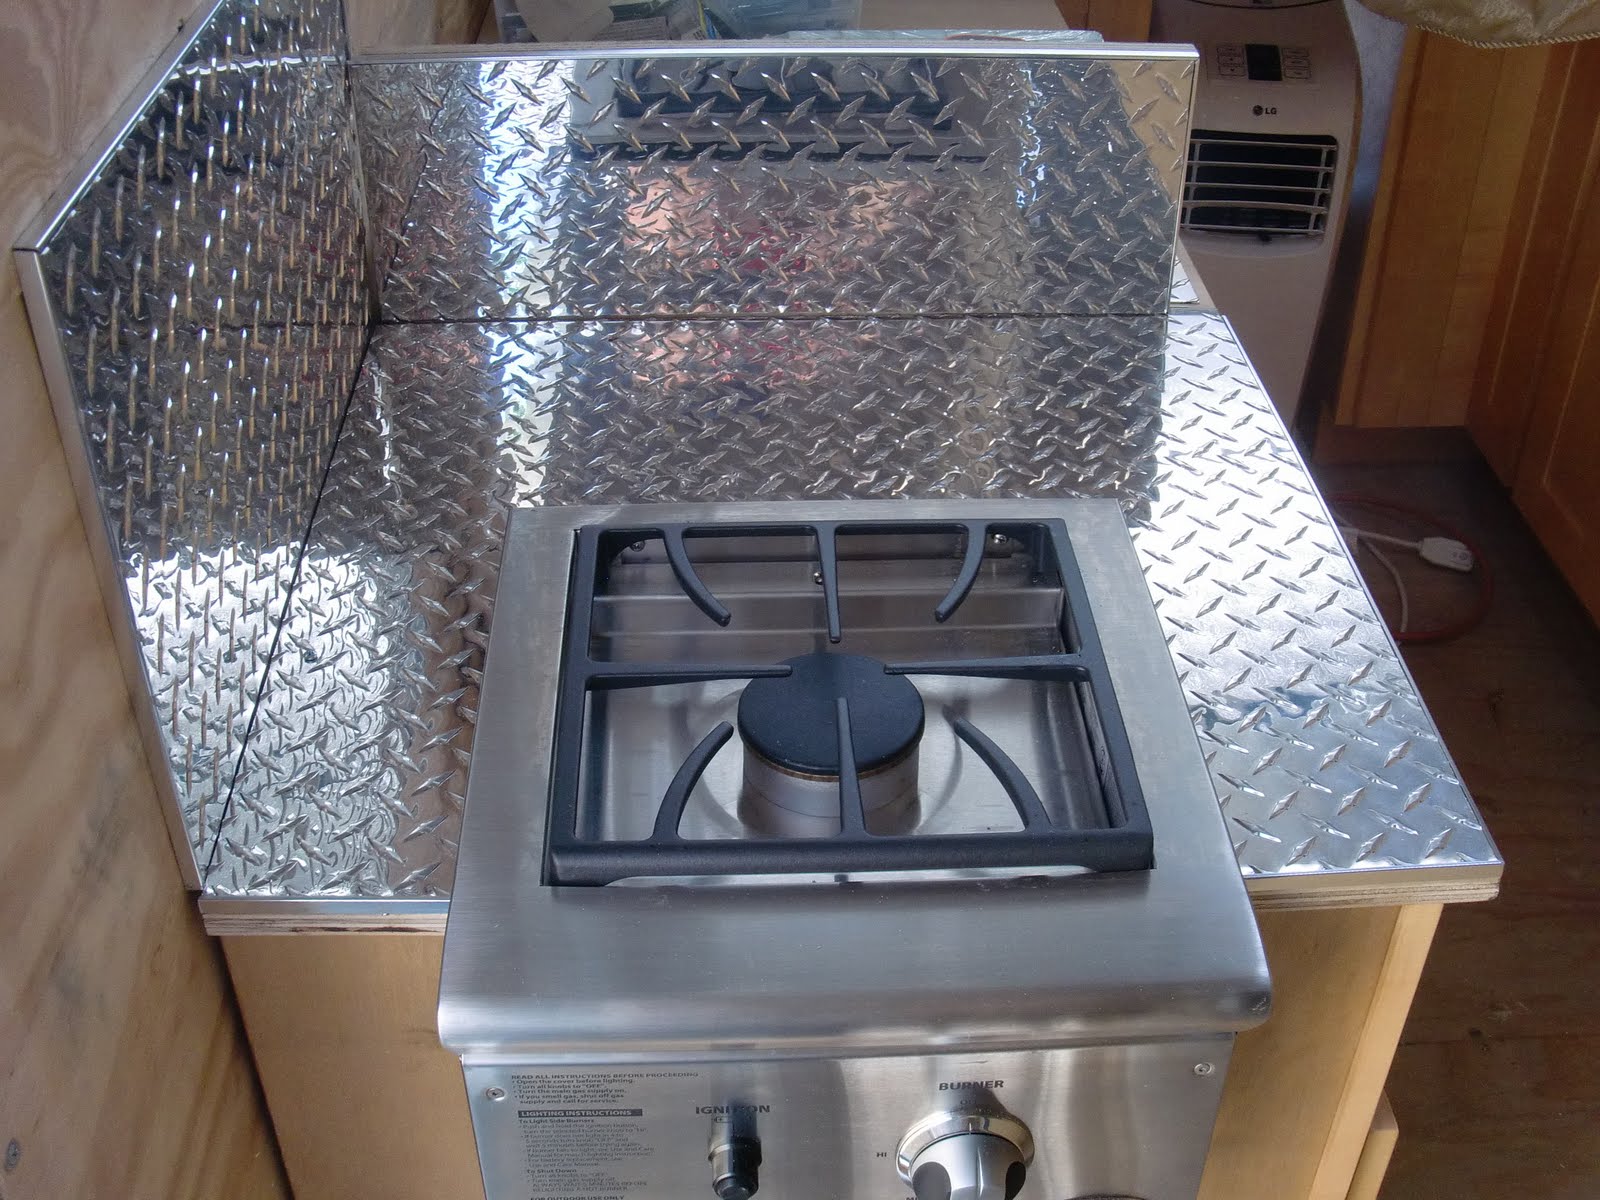
Cabinet & counter tops, the right side has a 9" raised back stop
for the DCS burner & to stop the ARB cooler from sliding,
even though there are 4 bolts to hold it down and in place.


The grill will be enclosed with 16 gauge Diamond plate latter,
to make a nice fire proof surface & give it some extra glitz.
I installed it sideways into the cabinet, as I did not want to cut
into the front of the cabinet doors.


Burner works great, now I just need some steaks to get started.


Now that the cabinets are finally in, the wiring will come soon.
I have decided to make most electric runs in Wiremold.
that way everything can be worked on latter, 1-2-3.
I also found a 5 into 1 GFCI wall outlet extender today for $20.


Here is the PEX 3/4 water line, I used the red hot water line as it can
take more heat and pressure then the blue cold water line.


Here are the batteries inside a 24" cabinet, that will hold a box
inside of a box, hidden inside the cabinet, that will open from the counter top.


Battery box opens from the top of counter, it will be more hidden latter.


Found some outlets that have a USB charges built in.


5 into 1 GFCI wall outlet extender, as I will install this into a 20 amp single outlet
on # 12 copper wire, covered by a 15 amp fuse, also the 5 items like
TV, cell phone, DVD player and Hard Drive will not suck
more then 200 - 300 watts max - I am not worried about starting a fire.
It will be set up as triple kill - over protection.
I have seen too many nice RV fires on U- Tube.


Laugh while you can, this mickey mouse antenna gets
68 Channels from my driveway in Silicon Valley,
well most are Chinese & Mexican, but never the less
I was blown away by this small $59 antenna.